
Installing the Stripe Extension
Before you can set up Stripe as a Payment Processor, you'll need to install the Stripe extension on your Powerbase. Please email support to ask us to install it.
Getting a Stripe Account
Note: if you already have a stripe account, please create a new one for Powerbase. It's easy and free - you don't even need a new Stripe login. In the top left corner, click on your organization's name and select "Create new account".
After you have signed up for a Stripe account, login to the Stripe Dashboard.
You will need:
- a publishable key for the live site
- a secret key for the live site
- a publishable key for the test site and
- a secret key for the test site.
The publishable keys are public and all start with: pk_.
The secret keys should not be revealed to anyone. They all start with: sk_
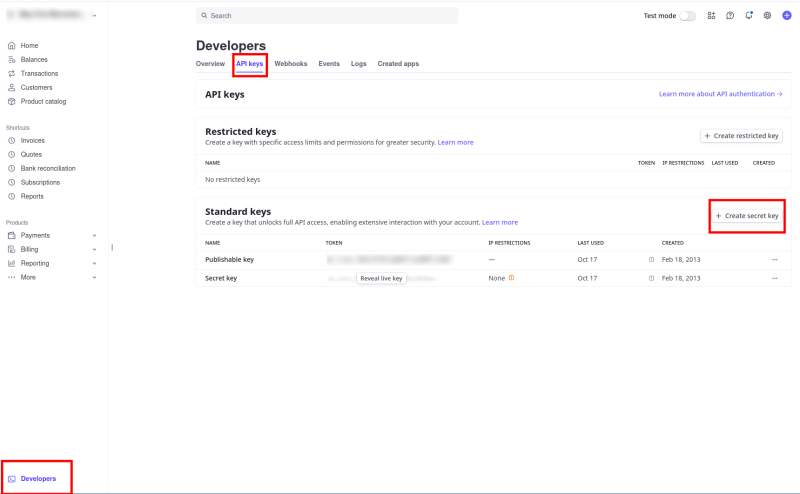
While logged into the Stripe Dashboard, look in the left side bar for the "Developers" link. Click "Developers" and then click "API". You will then see your live site publishable key:
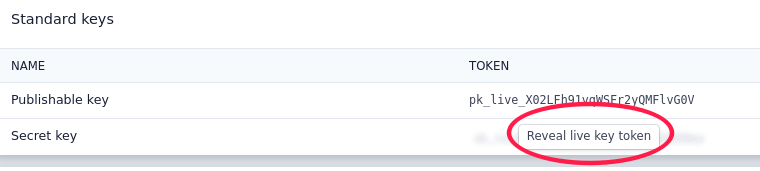
Next, click the "Reveal live key token" button (and you will need to re-enter your password) and you will see your live secret key.
Not done yet!
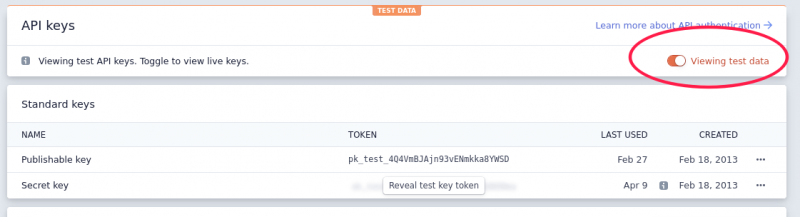
Then, click the "View Test Data" toggle and repeat these steps to record your test keys:
Configure Stripe as a payment processor
You can setup as many Stripe payment processors in Powerbase as you need. Some groups setup one for C3 payments and one for C4 payments - each going to a different Stripe account and configured with different Stripe API keys.
Additionally, you can setup a standard embedded Stripe payment processor, which includes the request for the credit card right there on the contribution page. The donor has no idea it is being processed by Stripe, they simply add their credit card number.
Or, you can use Stripe Checkout, which redirects the donor to a page hosted by Stripe to collect the credit card information (which also allows you to collect payments via ACH, Google Pay or Apple Pay).
You don't have to choose! You can setup one payment processor using the standard embedded approach and another using the Stripe Checkout approach and then decide which one to use on a contribution page by contribution page basis. You can even offer both methods on the same contribution page if you want.
Standard Embedded Stripe
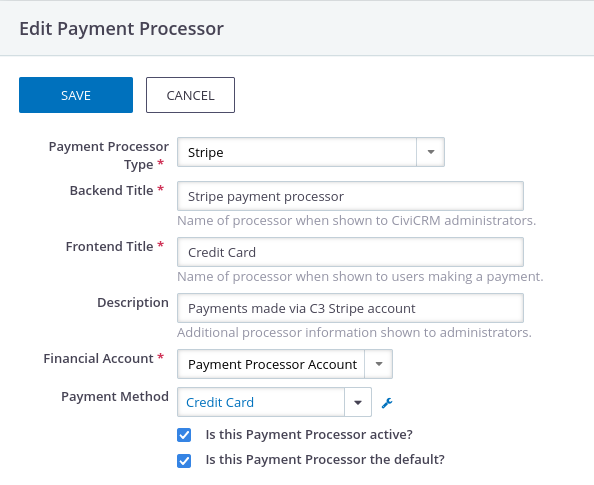
In your Powerbase, click Administer -> System Settings -> Payment Processors.
Click the button to add a new one.
Top Part
From the Payment Processor Type select box, choose Stripe. If you don't see Stripe as an option, contact support to have the Stripe Extension enabled.
Select a Financial Account (use Payment Processor Account if you are unsure).
For the "Backend Title" enter something recognizable to you. This will only be displayed internall. For exmaple: Stripe Payment Processor.
For the "Front end Title" pick something that will be sensible when viewed by someone making a contribution, like "Credit Card".
Bottom Part
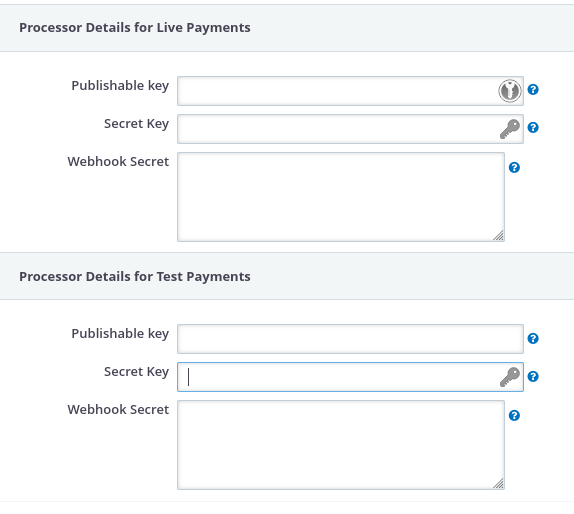
Next, enter your live and test keys. The live keys will start with pk_live (for your publishable key) and sk_live (for the secret key). Similarly, the test keys will start with pk_test and sk_test. Be sure to fill in both!
If your screen makes any references to "URLs" you can leave the default or leave it blank.
Using Stripe Checkout to support ACH, ApplePay, GooglePay or Link
Repeat the steps above to fill things out exactly the same way, but choose "Stripe Checkout" instead of "Stripe" as the Payment Processor type. You can use the same API keys as you are using with the regular method.

If you choose to enable ACH, you have to take an additional step in Powerbase. Click Administer -> CiviContribute -> Stripe Settings and in the "Supported payment methods for Stripe Checkout" field, ensure that ACH is selected (Apple Pay and Google Pay do not need this step).
For the last step, you have to visit the Stripe Dashboard again, click the Gear Icon or the Settings link, then Payments, then the Payment Methods tab, or go directly to the payment methods section via this link. Enable the payment methods you would like turned on.
Be sure to immediately test your donate pages that use Stripe. If you connect from a web browser that has a Google or Apple wallet configured, you should see the appropriate pay options.
Handling Credit Card testers
As we document elsewhere, we sometimes get hit with credit card testers who have stolen a lot of credit card numbers and want to use our donation pages to test which ones are working and which ones are not.
Unfortunately, because of Stripe's unique (and in other ways more secure) design, the methods described on our general page don't work with stripe.
If your site is being used by card testers, we recommend enforcing a recaptcha on every contribution page. We are now using version 3 of recaptcha which means users don't need to enter anything to be verified. You can do that by contact support for help or:
- Go to
Administer -> System Settings -> Form Protectin Settings - Where it says "Enable reCAPTCHA on forms" - choose "Contribution Page" or "Contribution Pages" and "Event Registration Pages" and "Event cart payment form" - depending on where you want it to appear.
- Save
- Test your contribution pages