
Introduction
To collect information from your web site, you have to tell PowerBase what fields you would like to collect. For example, if you’d like to send newsletters to supporters, you’ll need to collect email address, at minimum, and first name and last name and an email address and possibly an address field such as zip code. A profile allows you to define those fields and create a form for people to fill out.
Or, if you’re collecting registrations for a fundraising dinner, you might need to collect additional information such as the full street address and dietary preferences. A profile allows you to specify these fields and the configure your event or contribution page to use the profile you have created.
Some of this data might not be predefined as part of PowerBase. In that case, you’ll will have to create custom fields.
This document describes how to use Profiles to create these forms. In addition, there is a more advanced way to create forms called webforms. And, once you master profiles, you may want to use profiles to get your members to update their own information.
NOTE: We refer to any data collected from your external public-facing pages that appear on your web site or directly on your PowerBase site as “on-line”, “public”, or “external” and data input by you or your colleagues who have logged in as “off-line”, “User and User Admin Only”, or “internal” . Of course, all of it is online, but this is a convenient way to separate out pages that you are preparing for the general public and pages that will be used internally.
This section draws on information from the CiviCRM manual on profiles.
Create a Group
We recommend creating a group beforehand that will hold the new entries that come into your database through the external site. You can do this with the Contacts -> New Group menu option.
Creating your Profile
To start, click Administer -> Customize Data and Settings -> Profiles
Then click the Add Profile link
Carefully choose your profile name and description. Several months from now you want to be sure that any staff person will easily understand what the purpose of the profile is. In a year or two you may want to delete unused profiles to reduce clutter so the name and description is key.
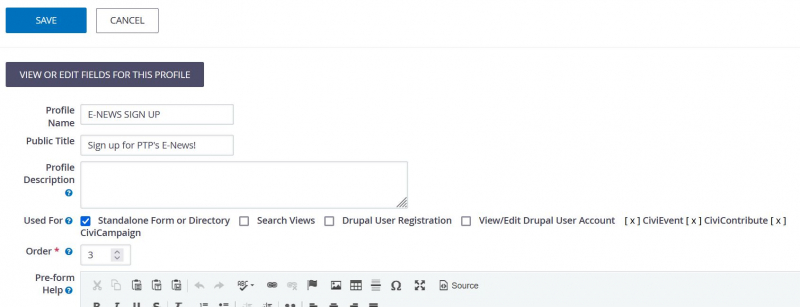
In the "Used for" box, leave all options un-checked if you are creating a profile to go with an Event page or a Contribution page. If you are creating a profile for people to fill out directly, then check the "Standalone Form or Directory" option.
The "Order" box simply controls where it appears on the list of profiles. It can be left to the default value.
The pre and post help allows you to add additional help text to your form and are optional.
Advanced Settings is quite important:
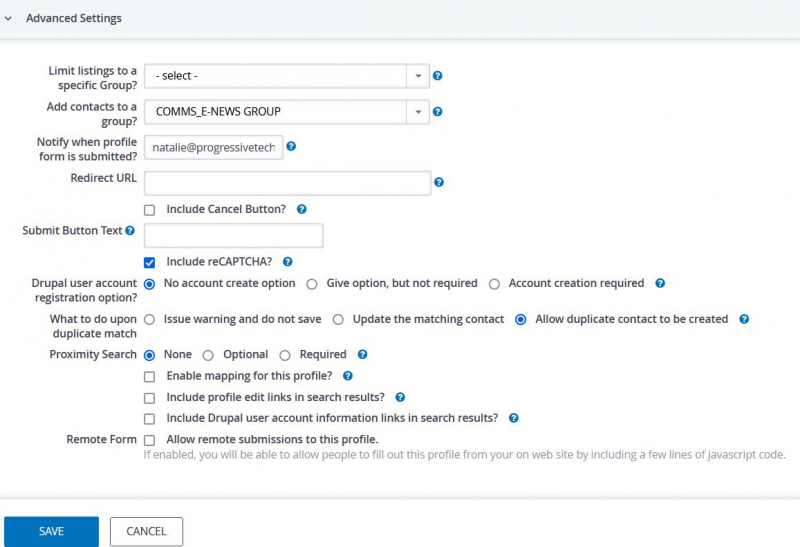
- "Add new contacts to a group" is where you can choose the group you created in the earlier step
- Check the box for "Include reCAPTCHA" if you want to display reCAPTCHA to prevent bots from submitting on your form
- For "Drupal user account registration option?" select "No account create option"
- "What to do upon duplicate match," in most cases, should be set to "Allow duplicate contact to be created". It is better to manually review your duplicates and merge them by hand then to risk an automatic merge that may overwrite good data with bad data. If you are putting your contacts in a group, then you can de-dupe just the group to save time. After they have been de-duped you can remove them from the group.
- For "Proximity Search", select "None"
- You can also set options such as a thank you page to redirect users to upon completion and an email address to use to notify admins when it is filled out.
Once you have saved your profile, you will be prompted to add the fields you want to it.
Using your profile
Now that you have your profile, what next?
You can start using it right away. From the profile listing page, if you click More -> Use Profile - Create mode you will be able to start using it right away.
You can also ask support to link your profile to your custom theme so it appears to look like your web site. Then, you can simply add a link to your main web page that takes you to the profile page.
You can also click "More" and then "HTML Form Snippet" and copy and paste this code directly on your web site (this approach is difficult so we encourage you to ask for help from support).
Browsing your profiles
If you have Administer menu access, you can create the profile going to Administer -> Customize Data and Screens -> Profiles.
You will come to another screen that allows you to add or update an existing profile. It has two tabs: User-defined Profiles and Reserved Profiles. We are interested in the User-defined Profiles for this document, but from time to time knowing where the Reserved Profiles are stored can come in handy for changing some default settings.
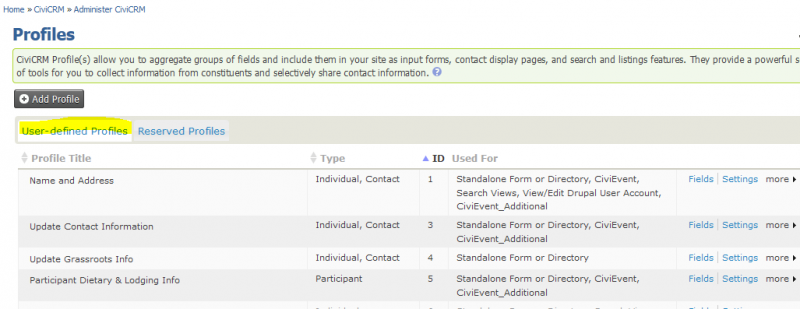
The list includes the:
Profile Title which is name of the profile which, by the way, is used on Public facing pages as the heading above the fields,
Type, which indicates which tables are being used,
ID is very important. It’s used to differentiate among all the profiles that you have. You need to know it in many cases for external web form use.
Used for, which shows the uses that it can have. On the right you have some options for modifying the profile.
Fields brings up the list of fields associated with the profile.
Settings changes the overall profile. It has fields like Profile Name (aka Profile Title), help text, and some other critical information.
The more option includes additional actions.
Preview shows the entire profile.
Use Profile-Create Mode will allow you to do data entry with the profile, if it’s been set up for that.
Disable makes the profile unavailable for use, but does not delete it.
Delete does delete it. Deleting a profile will not delete any data in your database, but it may cause a problem if the profile is in use on an external page somewhere.
HTML Form Snippet opens a page with html coding that can be copied and used in another web site. This is typically used in situations where your web site is collecting contact information such as name and email address for e-newsletter sign ups.
Copy Profile will make a duplicate of the profile. This is a handy way to get started with a new profile. Just rename it after you get it duplicated.