
Overview
While doing data entry directly into Powerbase is the easiest way to add contacts and add an activity, often we end up with a spread sheet that we would like to import.
In this example, we'll cover how to import a spread sheet of contacts who were door-knocked and add a door knocking activity to their record.
As with all imports, we start with importing the records as contacts. Then, we'll cover your two options:
- Find your contacts and add an activity to them via the search results page (if everyone's activity is the same, this is the best approach)
- Import the spread sheet a second time as activity records (to record different information for each contact's activity)
You can watch the screencast below or follow the step by step directions below the screen cast.
Screencast
Step by step directions.
Import your records as contacts
- First, import your spread sheet as contact records. This process is covered in our contacts import
- On the first page of the contact import, choose the option to Update duplicate contact records, rather then skip them.
- When importing your contacts, be sure to put them all in a group on the last step so you can find them.
By updating duplicates and putting all records into a group, you ensure that you will end up with a group that includes everyone, whether or not they were already in the database.
Finding your contacts and adding an activity
If all of your records can use the same activity (for example, everyone was door-knocked on the same day and there is no individual information in your spread sheet that should be imported into the activity record that would be different for one contact as opposed to the other), then you can simply generate an activity record for the entire group in one fell swoop:
- Click
Search -> Find Contacts - Select the group you used when importing your contacts
- Select all records and choose "Add Activity" from the drop down menu.
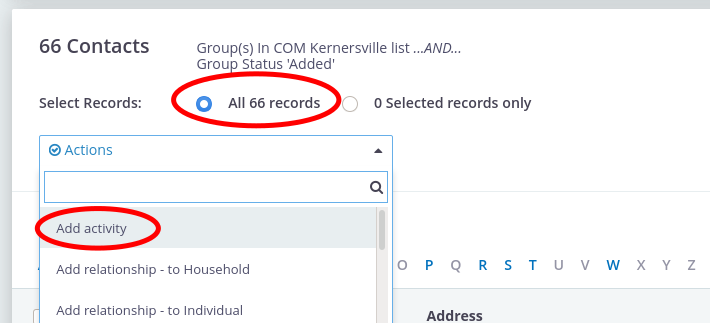
- Next, select an activity type from the drop down list
- Choose your "Activity Separation" choice:
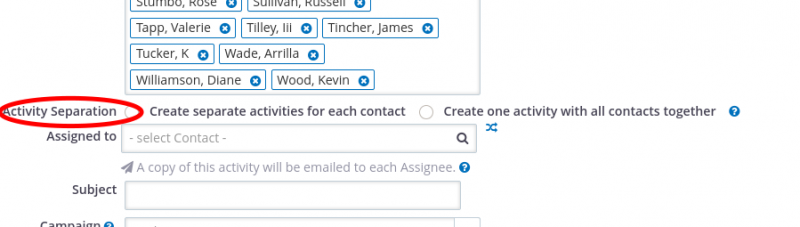
If you did one single activity with all of these people (for example, had a meeting) then choose "Create one activity with all contacts together". However, if each activity was different for each contact (for example, you went door knocking and knocked on each door separately) then choose "Create separate activities for each contact"
More info: If you create one activity with all contacts and later change or delete the activity, it will be changed or deleted for everyone. If you create separate activities, then you can change or delete the activity for one contact and it only affects that one contact.
- Fill in any relevant details (subject, description etc)
Importing your Activities
As an alternative to the step above, you can choose to import your activities instead of generating an activity for each contact.
Importing your activities is a good idea if each activity is slightly different (for example, there is a different date for the door knock, or you have individual details in your spread sheet that you want recorded in the activity record).
When importing your activities, you may have to add data to your spread sheet so you include all the required data in an activity record. In particular, be sure that you have the following data in your spread sheet:
- Activity Type: You must have an activity type (like Door Knocking, Meeting, Phone Call) that matches exactly the name of an Activity Type available in your database. You can click
Contacts -> New Activityand look in the drop down field for the Activity Types available to you. - Date: You must have the date that the activity happened - be sure to use 4 digit year
- Subject: You must include a column with the Activity Subject
- Activity Status: This is technically not required (it will usually default to Scheduled). If you want it to be something else, enter it in your spread sheet, e.g. "Completed".
Be sure to create a column for each of these three fields and copy down the values you want for each field.

Next, click Contacts -> Import Activities
Be sure to check off "First row contains column headers" and choose the date format your dates are in.
Then, map your fields:
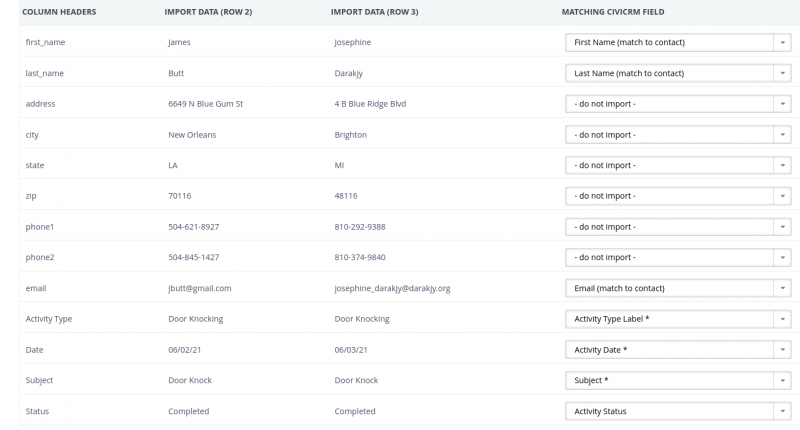
Note: You only need to map the contact fields needed to match your contacts (first name, last name, email in most cases) - you can leave other fields (like address fields) as not to be imported. Also - unlike the screen grab, be sure to use 4 digit year to avoid getting activities dated 1921.
Then, click Continue and you will have a chance to review your mapping. Lastly click Import to bring them in.