
This document covers what you need to know keep your email list healthy with low rates of bounced emails and unsubscribes. You should be able to use this documentation to assist you in understanding mailing reports and knowing what to do with them to keep your mailing lists clean. We’ll also cover what happens when someone unsubscribes from a mailing list group or to all future emails.
Definitions
Bounce – an email that was sent from your PowerBase server that triggered an unusual reply from the receiving email server.
Bounce Message – the reply from the email server tells PowerBase something about the fate of the email that you sent.
Bounce Reason – The extract of the Bounce Message that Power Base is using to determine the Bounce Type
Bounce Type – a group of 11 categories used to decide whether to hold an email address or not.
Hold – A status of an email address that will prevent PowerBase from sending to new emails to it. An email is flagged as on Hold if a certain threshhold of bounces are recorded. The Hold status is set automatically.
Un-Hold – Removing the hold status of an email address, a process that you can do to a single address or a group of contacts.
Unsubscribe – An action an email recipient takes to be removed from a specific mailing group by clicking on a link in an email. If the email was sent to muliple groups, the user sees all groups they are part of and can choose which ones to be removed from. They will continue receiving bulk email sent to other mailing groups and all other email messages.
Bulk Email Opt Out – An action an email recipient takes to be removed from all bulk email messages, not just those sent to a specific mailing group. When creating a mailing template, you can include either a Unsubscribe link, an Opt out link or both. Just an unsubscribe link is provided by default. Contacts flagged with Bulk Email Opt Out can still recieve email messages sent as activities, contribution receipts, event registration notifications and scheduled reminders.
Privacy Option: Do No Email - A flag set manually after a contact has notified you that they don't want any email. Unlike "Bulk Email Opt Out," they will no longer be able to receive email sent as activities. But, they will continue to contribution receipts, event registration notifications and scheduled reminders.
Mailing List – In PowerBase, any group of contacts that has a Group type of “Mailing List” and therefore eligible to be sent emails via the Mailings Menu. To see which groups are Mailing Lists, go to Contacts > Manage Groups.
Bulk Email – emails sent from the Mailings Menu in PowerBase.
Email Host or Server – the computer that holds the email accounts. When bulk email is sent, PowerBase uses its email server to send the email and receive the replies from the recipient’s email server.
CiviCRM – the open source software that Progressive Technology Project uses as part of PowerBase’s services. CiviCRM contains the software code that handles most of the issues described in this document. See https://civicrm.org for more information about CiviCRM
Bounced Emails Explained
Each time you use the Mailings function in PowerBase to send a mass email (also known as a bulk email or email blast), it’s possible that a few of the emails will bounce and may not be delivered. Bounced emails can result in the email address getting held. Why does this happen, and what can you do about it? How do you find bounced emails that have put email on hold?
Why Emails Bounce
If the email bounces, it means it was sent to the recipient’s email host, but the email host responded with an unusual message. In most cases the email never reached the recipient. It can happen for a number of reasons, including the following:
1) the email address has a typo and is incorrect
2) the email address doesn’t work anymore or is out of commission
3) the email inbox is full and can’t accept more messages temporarily
4) the recipient has an automatic away reply message because they are on vacation or out of the office. In this case, the recipient will see the email when she returns.
As you can see, bounces happen for different reasons; some bounces are due to a permanent problem with the email address and some are because of temporary condition. A permanent problem, for example, is when the address is no longer valid. A full mailbox bounce message is due to a temporary condition, but if it’s received multiple times for an email address PowerBase will put it on hold.
You can “un-hold” emails, but if it’s a bad email address, it will just get held again, so it’s better to get a new email address for the contact or remove it. Emails will bounce if a mailbox is full, so in those cases you want to “un-hold” because, we hope, at some point the mailbox will get emptied. Let’s look into what PowerBase tells you about bounces.
Bounce Types
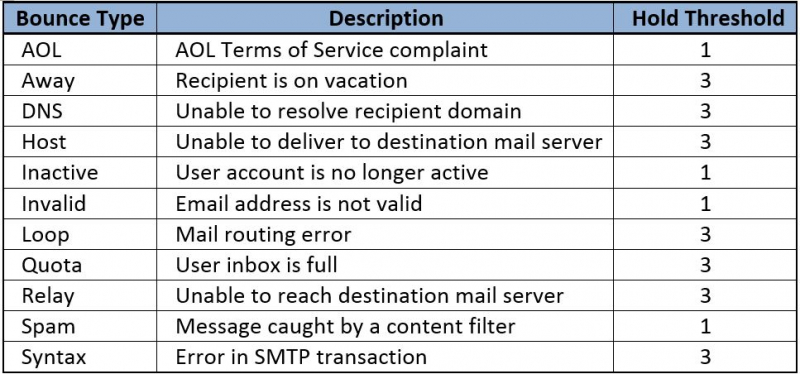
When an email is sent, a message comes back to PowerBase from the mail host that is receiving it. PowerBase has software that attempts to interpret the message and, if it finds that the original message was not delivered without incident, the software categorizes the reason for the bounce. PowerBase then makes a decision about whether to put the email address on hold or not.
Email bounce messages are not standardized, so PowerBase does not always succeed at categorizing the reason for the bounce. In those cases, you may see a Bounce Reason of “Unknown bounce type: Could not parse bounce email”.
An email will be put on hold if it bounces as many times as are shown in the Hold Threshold column. When the bounce is for a temporary condition and if the number of bounces of this email is below the “hold threshold”, PowerBase will still try to send to this email address next time you include it in a bulk email. A threshold of 1 means the email with that type of bounce has will be held after only 1 bounce. For example, an Away bounce must happen 3 times before an email is put on hold. By contrast, just one Inactive or Invalid bounce will result in the email getting put on hold.
Here’s more on bounce handling in the CiviCRM documentation: https://wiki.civicrm.org/confluence/display/CRMDOC/Bounce+Handling
Manage Held Emails
When emails get put on hold in PowerBase, you can decide what to do with them. The process is to locate the held emails, find out what the reason is for the hold and then, depending on the reason, un-hold them as a group or change or remove the email addresses for each contact. We’re going to describe two approaches to handling this. The first approach uses the mailing report of specific mailings and is for folks that like to keep up with problems as they pop up. The second approach is to be used if you want to search through your entire database for bad email addresses and intend to clean up and catch up all at once.
Managing Held Emails Approach I – Keeping Up
The best practice for keeping up is to look at the mailing reports from each bulk email that you send.
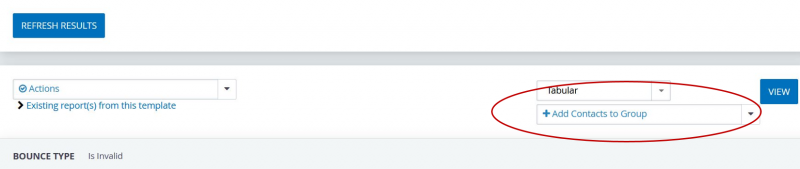
- You might want to do this a series of times with the each of the “bad” bounce types to get all the bad emails into a group (or groups).
- From here, it’s possible to add all the contacts in your search results to the group you created before.

Once you have these contacts in a group, you can edit all their emails at once using Batch Update via Profile. Note: this will only work if you can correct their email addresses. You will not be able to use Batch Update via Profile to delete email addresses en masse.
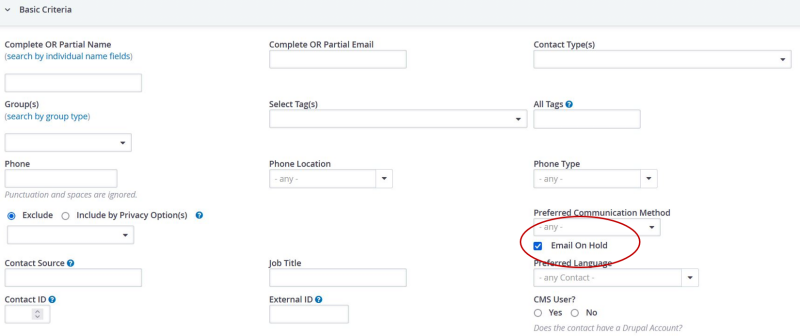
Pull up the group via Advanced Search by selecting the group in the dropdown menu in the Basic Criteria section. We recommend also selecting Email On Hold to eliminate anyone whose email bounced previously but has been corrected in the meanwhile.
Select Batch Update via Profile for all the results whose email addresses you can correct/update.
You will need to have a profile in place that contains just Primary Email.
Select this profile and make edits where possible. Click Update.
It may also be a good idea to regularly look at the mailing report of each mailing you send, view the bounced emails, and clean up those few that are “invalid” or “inactive”. For example, for a recent mailing you sent, you could remove/update the emails of those whose emails bounced according to the mail report.
Managing Held Emails Approach II – Cleaning Up and Catching Up
Finding held emails and releasing emails that have been held for temporary conditions The best way to segment held mail is to use the Mailing Reports off of the Reports Menu to find them, put them in a group and then un-hold them in a batch and then remove the no longer needed group.
Step 1 Create a smart group of all held emails (one time task) Go to Search-> Advanced Search.
Select the “Email On Hold” box. If you wish to further restrict the list, add whatever other criteria you need. For example, to limit it to recent emails, go to the Mailings section. Click Search and when the results list appears, click on the round circle to the left of “All nnnnn records” with “nnnnn” representing the number of records found in the search. From the “- actions -” list, select “New Smart Group”. Click go and create the group. Since this group will come in handy in the future, save it with a permanent name.
Step 2 Create a Temporary Group to hold the list of contacts to be un-held. Go to Contacts->New Group.
Give it a name. PTP recommends creating temporary groups that are to be deleted with a name that indicates that it’s temporary. Our practice is to put the underscore (_) as the first character of the group name. For this task, a good name would be “_Emails to be unheld April 2013”.
Step 3 Find the emails that can be unheld via the Bounced Report method Go to Reports->Create Reports from Templates. Find the Mail Bounce Report and open the template. Select display the columns Bounce Reason and Bounce Type.
In the Set Filters section, select the Group of all held emails that you made in Step 1. You’ll be running this multiple times to get different Bounce types, so pick one to start and keep track of which ones you’ve done. You should select all the bounce types that have a threshold greater than one, because these are temporary bounce types. Run the report and go ahead and select Preview Report. Then select the temporary group that you made in Step 2 and select “Add these Contacts to Group”. By doing this, you’re making a group of email addresses that can be unheld.
Step 4 How to Un-hold Held Emails Go to Search-> Find Contacts - Advanced Search.
In Basic Search Criteria, Groups, select the Temporary group that you made in step 2. Press Search.
Once you have the list of contacts with held email addresses to be released, choose the action Un-hold Emails from the dropdown list and click Go. All emails will now be un-held.
Remember: held emails are different than unsubscribed emails. You can safely un-hold ALL emails without worrying — you still won’t send mail to unsubscribers.
Step 5 Removing Bad Email Addresses Once you’ve un-held the temporarily bad email addresses in Step 4, the remainder of emails in the group of all held emails that you created in Step 1 are all bad email addresses. Some of the contacts in the group may have a second email address that could be substituted for the bad one. For most, though, you’ll have to clear the email address or get a new one. You can work on their emails using Batch Update via Profile. Note: this will only work to correct the email addresses. You will not be able to use the Batch Update via Profile to delete email addresses en masse.
To prepare for this activity, you will need to have a “Profile” created that holds all the possible email addresses for a contact. We recommend putting in Primary email, Work email, Home email, Main email and Other Email (if used) because then you can see all the alternate emails that the contact has. Also add the “Do Not Email” privacy setting and the “Reason for Do not e-Mail” fields. Explaining how to create that profile is outside the scope of this document.
Go to Search-> Find Contacts - Advanced Search.
Pull up the group by selecting the group in the dropdown menu in the Basic Criteria section. If it’s a mixed group of individuals and organizations, limit the search by contact type to one or the other as Batch Update via Profile only works with one contact type at a time. Click Search.
Select Batch Update via Profile from the –actions- list. Select the profile created earlier. Select the set of contacts to work on. On the Batch update list, move copy email addresses It’s helpful to populate “Reason for Do not e-Mail” field with a message like “bad email” and the date. Set the “Do Not Email” flag on.
Select this profile and make edits where possible. Click Update.
The Difference Between On Hold Email & Unsubscribes
Bounced emails are different than unsubscribed emails. Unsubscribers have clicked the linked text in an email that said “unsubscribe from this mailing”. This link is created by one of these tokens in an email: {action.unsubscribe} or {action.unsubscribeUrl}
Email recipients who unsubscribe from a single mailing list will simply be removed from the group you used as a mailing list to send to.
To find an example of an unsubscriber, go to the Mailings section of Advanced Search.

Click on one of the contacts in the search results and take a look at their Groups tab. You can see it says Removed (by Web) from the mailing list group from which they unsubscribed. Notice that their email is not held because it’s not in red as shown in the second example below. For example, you could send a non-bulk email to someone who has unsubscribed from a single mailing list group and she would get it.
Unsubscribed
View from the Groups tab of a contact record

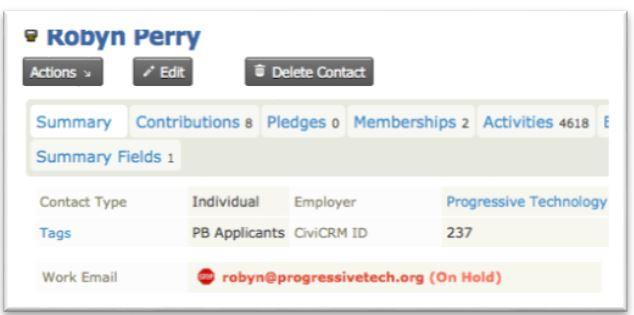
On Hold
View from the Summary page of a Contact record with email address on hold.
What is an Email On Hold?
Email gets put on hold if PowerBase tries to send an email blast determines that it’s not a valid email address. This happens when you send an email and it bounces. That means it never reaches the recipient. Emails bounce for a number of reasons: a full inbox that can’t take in any more messages, a typo in the email, an email address that is out of commission, and various other, more obscure reasons. Reread section I for more details on bounces.
Only some bounces actually get the email put on hold. Some bounce types are determined by PowerBase to be just temporary problems, and the email won’t get put on hold. This means PowerBase will still try to send email to this address in future mailings.
If the email is in red in a contact’s record, it is on hold. When you send email blasts, this contact will not receive them.
Find Out Who Unsubscribed
You may want to know who unsubscribes from your mailings. Here are two ways to find out. Use 1 if you want to perform some action on the unsubscribers, like putting them in a group. Use 2 if you just want to glance at who unsubscribed, but don’t need to do anything with the list.
1) Search on all contacts who unsubscribed from a particular mailing.
- Go to Advanced Search.
- Open the Mailings section.
- Type the name of the mailing you’re interested in.
- Click “Unsubscribes“.
- Click Search.
Your list is everyone who unsubscribed from that particular mailing.
If you leave the mailing name field blank and get all unsubscribers from all mailing lists. You may limit to a date range if necessary.
From here, you can create a smart group of unsubscribes or perform any other action from the dropdown list.
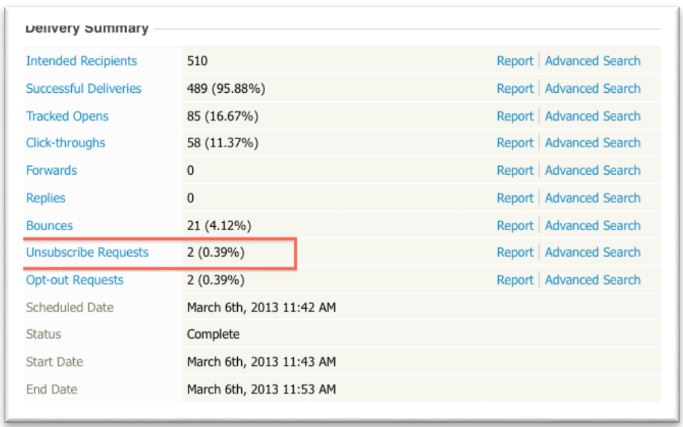
2) View a mailing report.
- Go to Mailings > Scheduled and Sent Mailings. Find the mailing you’re interested in.
- Click Report in the right column.
- In the report, you’ll see the Intended Deliveries and Successful Deliveries, Clicks, Opens, Unsubscribe Requests, Opt-out Requests, and other mailing details.
- Click Unsubscribe Requests to see everyone who has unsubscribed from this list as a result of this mailing.
Note: this is different list than the recipients who opted out of all emails. Read on for more.
What’s the difference between opting out and unsubscribing?
Email recipients also have the option of never receiving mail from you again by clicking a link you provide in every mass email. This means both regular email and bulk email will not be sent to them and is called “opting out”.
To opt out, an email recipient clicked the linked text in an email created by one of these opt-out tokens:
{action.optOut} {action.optOutUrl}
You can include these tokens in your mailing or in a footer message. For more on tokens, see here: https://wiki.civicrm.org/confluence/display/CRMDOC/Tokens
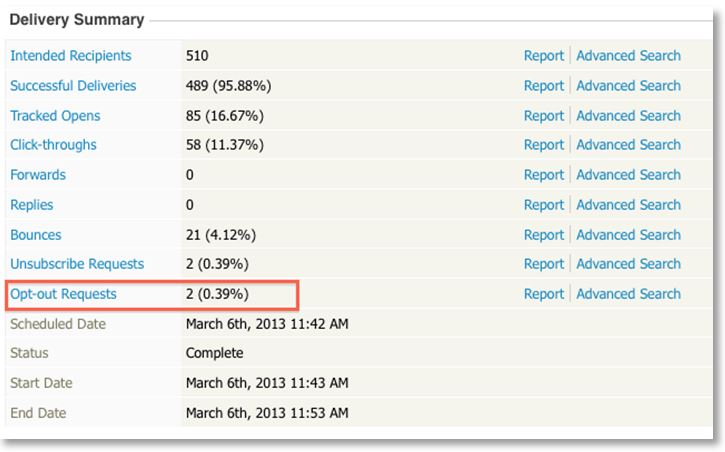
You may want to review the opt-outs regularly – it would be a red flag if you got a higher number of opt-outs than usual after sending an email. Follow the same steps on viewing a mailing report to see the opt-out requests. To view a mailing report:
- Go to Mailings > Scheduled and Sent Mailings. Find the mailing you’re interested in.
- Click Report in the right column.
- Click Opt-out Requests to see the list of everyone who has opted out from all mailings.
People who opt-out of all mailings will not receive any email from you, period. Their email is not held so it won't be un-held by the process of un-holding emails, as described in How to Correct/Update Held Emails above.
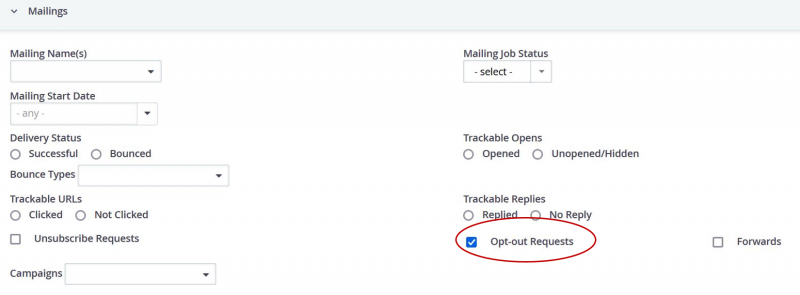
You can also find everyone who has opted out of future mailings from you via Advanced Search:
- In the Mailings accordion of Advanced Search click Opt-out Requests and hit Search. You will see everyone who has requested never to receive email from you.
If you take a look at someone who has opted out of all emails from you, their summary page looks like this:
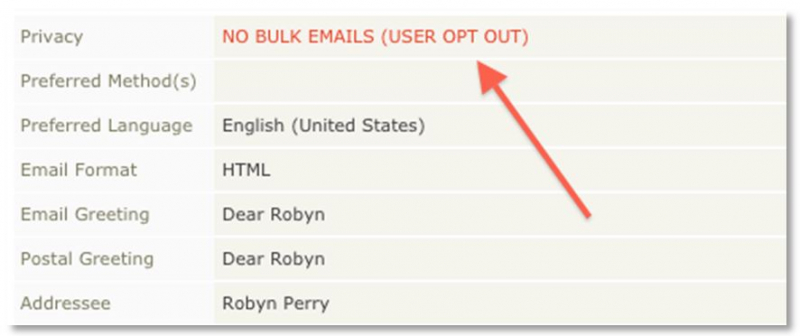
You will notice the email itself is not held, but the "opt-out" checkbox is selected in Communication Preferences. This stops all email from reaching this person as long as it is checked.
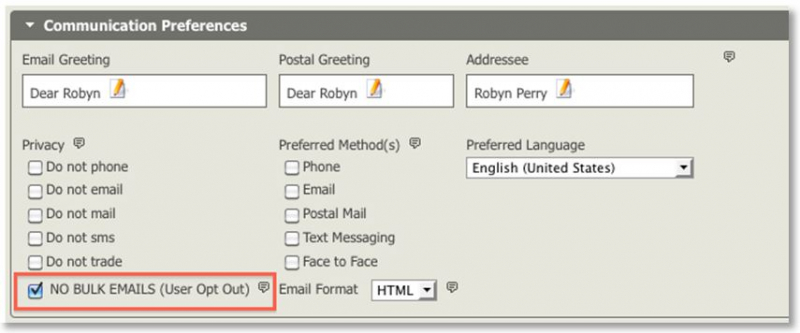
It is possible to remove the opt-out preference, but not advisable unless they explicitly ask to receive mail from you again. You can do this by editing their summary page and deselecting the NO BULK EMAILS checkbox shown above.