
Here is documentation on the workflow and how to setup and use Phonebanking in PowerBase. Note: The interface no longer allows you to to edit the profiles "on the fly" inside the Survey feature. You need to edit profiles from the Administer Menu.
Brief video how-to
Below is the basics of setting up the phone bank.
Steps
Phone Banks are set up and operated via the Survey section of the Campaign menu of PowerBase.
The basic work flow of Phone Bank is this:
- Configuration
- Determine if this will be collecting Donation or Membership payments and configure the survey link.
- Determine which fields should appear in the pop up when you mouse over a record in the survey
- Set up the Survey type of Phone Bank
- Add questions as custom data or reuse prior custom fields
- Put them on a profile or reuse a prior profile.
- Add them to the Phone Bank Survey
- Determine a “Result Set” and add it to the Phone Bank Survey 1.. Create Group(s) to be interviewed
- Prepare for volunteers
- Add survey to a menu
- Create volunteer logs in and assign them to a special permission group of PowerBase Phone Bank
- Train the volunteers and staff that will be calling
- Start Calling
- Using your new Survey, reserve contacts from the Group for each caller
- Caller logs in, makes calls and enters responses, including credit card payments
- Automatically release any reserved contacts after a day so they can be assigned again tomorrow.
- Monitoring
- Use Activity and/or Survey reports to track who has not been called.
- Use Contribution Reports to check on receipts
- Evaluating
- Contribution Reports for dollars
- Membership Reports for member renewals
- Activity and Survey reports for number of calls made
Introduction
Phone Banks are set up and operated via the Survey section of the Campaign menu of PowerBase. Survey is a general term used in PowerBase for the module that handles creating questions and collecting answers from a population. Surveys are used for a variety of purposes, such as collecting opinions, fundraising, and they even can be used for getting commitments to attend one or more upcoming events. Survey is not designed to serve as an online survey form. For that, one would use a custom profile or even a petition.
Survey permits you to allocate (reserve) contacts to individuals who will then call or visit the contact, interact with them, and record a result. If you are recording results online, you can directly link to a page to record a contribution or membership renewal for the contact. You can update information, such as phone numbers, directly in the contact record as well as record answers to the survey. Once a contact is reached and a result recorded, the contact will not be included in a call list for that survey again. You can automatically remove the reservations of uncalled contacts on a daily basis so that the next night’s volunteers can try to reach that contact again.
While this document will focus on phone banks, the same approach can be used for walk lists and other types of surveys.
Setup Configuration
Membership or Contribution Links
Phone bank can be set up so that each row in the survey has a link to the contact’s contribution or membership renewal page. Clicking on it opens a tab to the correct page for the contact. This speeds up recording payments while the contact is on the phone with the caller.
One time setup
Before using this function the first time, a PowerBase Administrator has to install the extension. To
do so, go to Administer>Administration Console. In the System Settings section, Select Manage
Extensions.
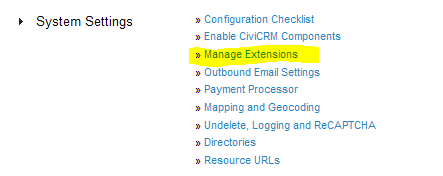
Select Install on the Survey Links row.

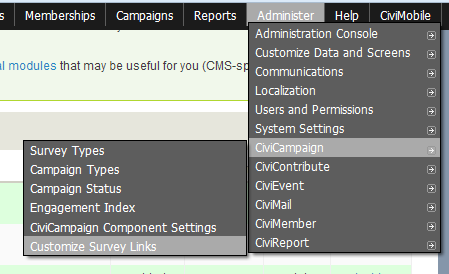
Once this is completed, the links can be turned on or off as needed. That is done via the
Administer>CiviCampaign>Customize Survey Links option.
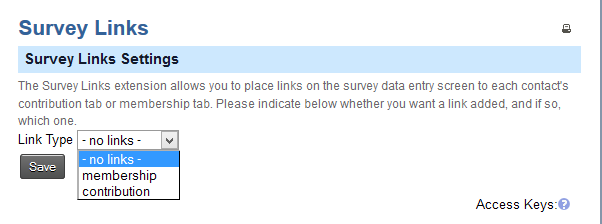
You can set the link type that you want here. Select whether the link will be to the membership or contribution contact page. Note: Once you select a link, it will appear on ALL surveys, until you set it back to - no links -
Summary Overlay
There is a handy feature called the Summary Overlay that is helpful for working with phone banks. It’s a pop up screen that appears when you mouse over the person icon on the phone bank list. It also works on the Search Results lists.
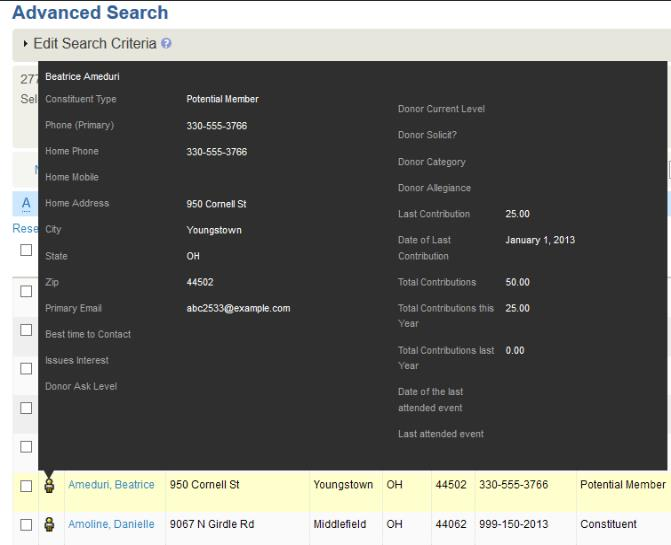
The benefit of this is that the person calling does not need to go to another screen to get detailed information on contact. You can see that there is a lot of space here for putting in information you will need as the call progresses. We’ve edited this example to put in items that are not in the default version.
You can edit the field list that go on this page by going to Administer>Customize Data and
Screens>Profiles. Select the Reserved Profiles tab. Select Fields on the Summary Overlay row.

You can add or subtract fields from here. It’s okay to delete or disable them. Adding or subtracting fields from a profile to not change the underlying data, i.e. they are non-destructive.
Setup the Phone Bank Survey
Preview
Here’s what a phone bank looks like when someone is calling through their list.

The first column is the icon. Hovering over it with the mouse will bring up the summary overlay. Next is a column with the name which is automatically added to the profile, and below it is the link to record a contribution page for the contact. This is automatically created if the Survey Link has been defined. To the right of the name are fields that come from the contact record and were placed there by the survey creator. Note that some of them are editable so the data in PowerBase can be changed on the fly. The right hand section after the Preferred Language column contains the fields that are the actual “questions”, that is, the information that we are specifically seeking from the contact via this survey. These answers will be recorded in an activity record of the type PhoneBank.
Questions are not required for a survey. Sometimes the remaining columns collect all the information you are interested in.
The last three columns: Notes, Results and Record Response are automatically created by the survey record. The caller calls the phone number of the contact and holds a conversation or gets voice mail. The next steps field is recorded. The Result is marked as Completed and the caller clicks Record Response.
New Survey
To create a phone bank survey like this, go to Campaigns>New Survey. You’ll get the screen
below.
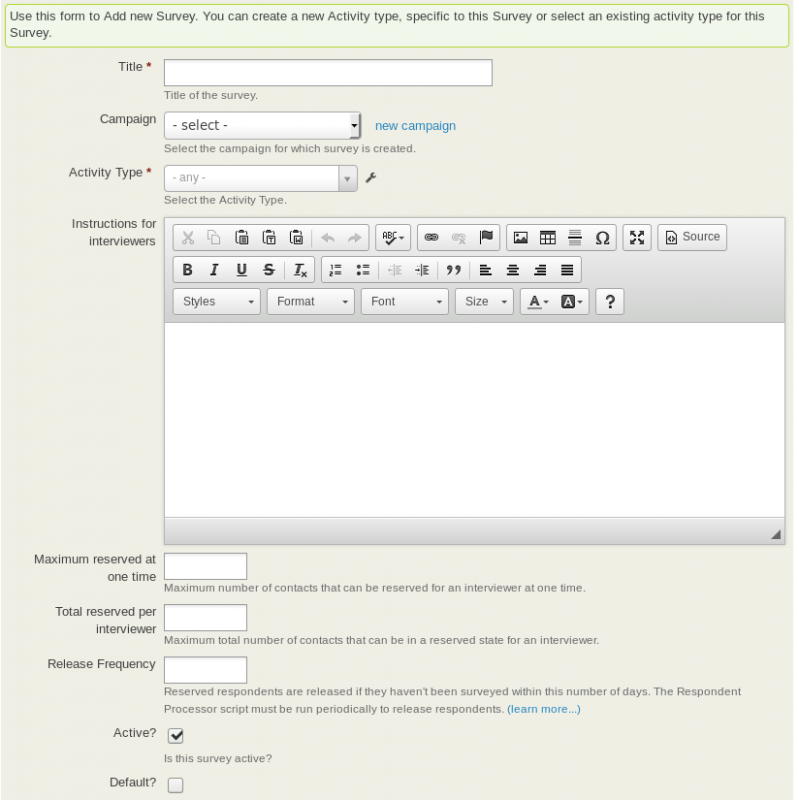
Put in the Title, select a Campaign and select the Activity type of PhoneBank.
You can fill in optional instructions for interviewers that will appear on the phone bank page.
The Maximum reserved at one time field holds the maximum number of contacts that can be reserved at any one time to be interviewed. Generally leave this blank.
The Total reserved per interviewer is the maximum that can be reserved for any particular interviewer.
Release Frequency is the number of days that a reserved contact is allocated to an interviewer. If the interview with the contact is not completed or released before this time is up, the reserved contact is released so that it can be allocated to another interviewer. Generally set this to 1, for one day.
Active? Check this box to make this an active survey.
Default? Check this box to make it the default. It’s convenient to have the default selected when you are reserving respondents later.
Questions
The blank Configure Survey Questions Tab appears with places for two profiles.
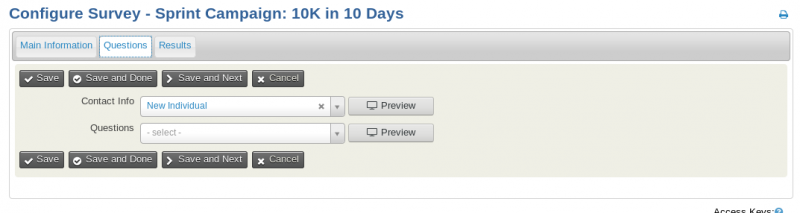
The idea is that one profile (the first one) is for contact information - so you can see or update on the fly a person's contact info.
The second profile is optional. You can add questions if you want to survey your members while makinga call and record the answers. If you want to use this option, you have to create the custom fields and a custom profile to hold the questions.
Results Tab
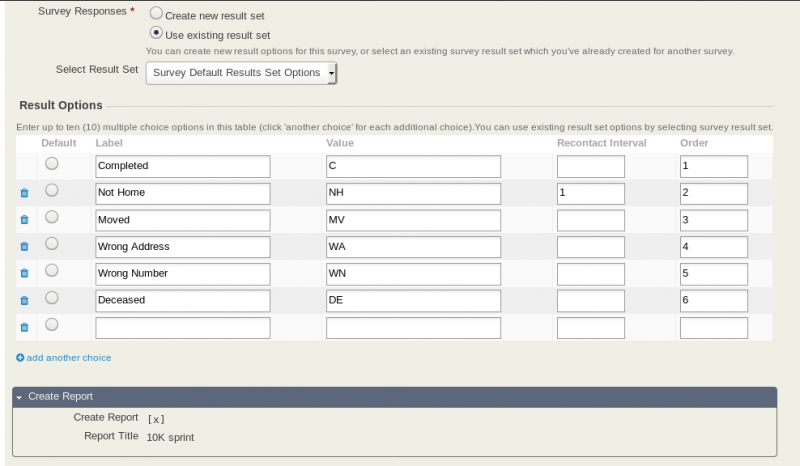
The Results tab holds all the values for the Results field. Every survey has a results tab. It has several functions:
- It can close the phone bank for this contact and mark it complete so that they will not get called again.
- As it closes the survey for this contact, it can track statuses of the survey that can be used for follow up actions
- It can release the contact from the phone bank and allow another person to call again later.
Begin by selecting existing an existing Result set and modifying it for your needs.
The Recontact Interval is the number of days to wait before this contact can be contacted for this survey. If it’s set to blank or zero, the contact is taken out of the survey pool once the result is recorded. In some cases, that may not be the desired result. Take “Not Home” for example. If the desire is to call the “Not Home” folks back, then setting a number of 1 will make them available to be called the next day. Setting it to 7 will delay it for a week. They will not be taken out of the pool.
Weight controls what order they appear in on the list.
You are not restricted to these results. Imagine a phone bank that was designed to simply find out if the contact was supporting a specific position of the organization. The result set could be Yes or No or Declined to Say. It’s good to include the other more general options as well. Phone calls are a good time to clean up the database so using the opportunity to record who moved, bad phone numbers and deceased are perennial result options. The organizer of the phone bank can query the survey results and pull up a list by these statuses or any of the other questions fields.
Create Report option defaults to yes. A report will be created for this survey with the name of the survey. You can override the name by filling in the Report Title field.
Clicking Save and Next will bring you back to the original Main Information tab. Click Save and Done to end the survey editing.
Reserving Respondents
Reserving respondents assigns contacts to an interviewer. When the interviewer logs in to start calling, this is the list of contact that will appear. Respondents will stay reserved until the interviewer calls them or they are manually or automatically released.
Assuming that you’ve prepared a group of contacts that you are targeting for the phone bank, and that you know who is going to do the calling, the best practice is to reserve them for each caller before the interviewer is waiting to get started.
Pay attention to the release frequency that you’ve set for this phone bank. If you’ve set a release frequency of a day, and you reserve them for a phone bank tomorrow, they’ll all be released before you get started. To get around that, set the release frequency to a longer period of time so that you have time to get ready for your callers or just reserve them the same day they call.
Go to Campaigns>Reserve Respondents.
Pick the survey that you want.
Pick the interviewer. The default will be for yourself unless you change it. The interviewer has to be someone in your PowerBase. It also should be someone who has a login into your PowerBase.
Pick the group that in which you want to reserve. Press Search which brings you to the search results list.
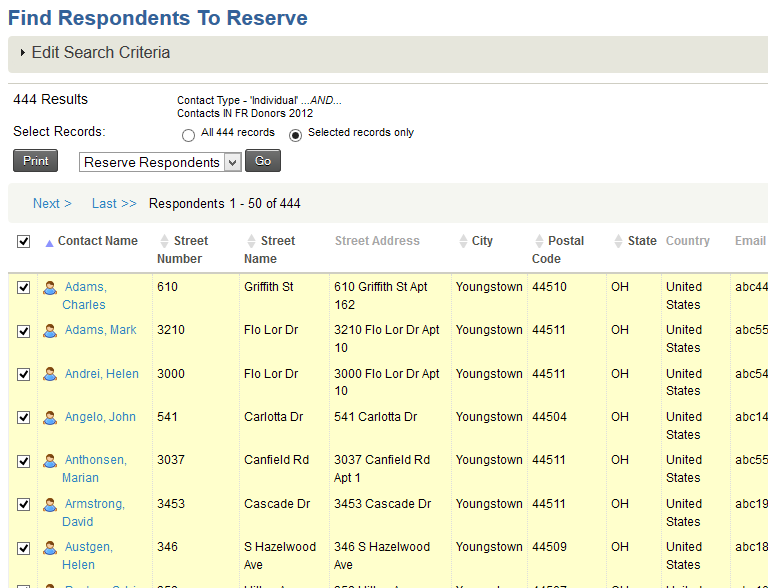
Select the number you want to reserve for this person. The count may be additionally limited by the settings on the survey. Click Go.
This brings up the Reserve Respondents Screen.
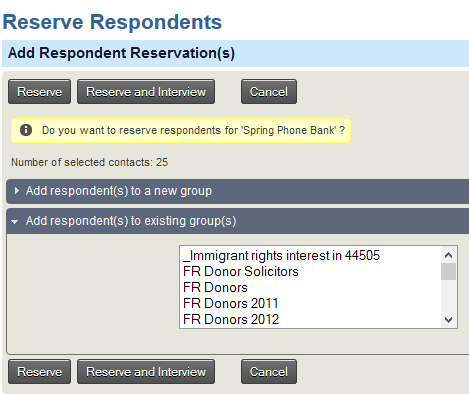
Click Reserve if you are reserving for someone else. Click Reserve and Interview if you are reserving for yourself and ready to start.
Conducting the Phone Bank
When the time comes to interview, go to Campaign>Interview Respondents.
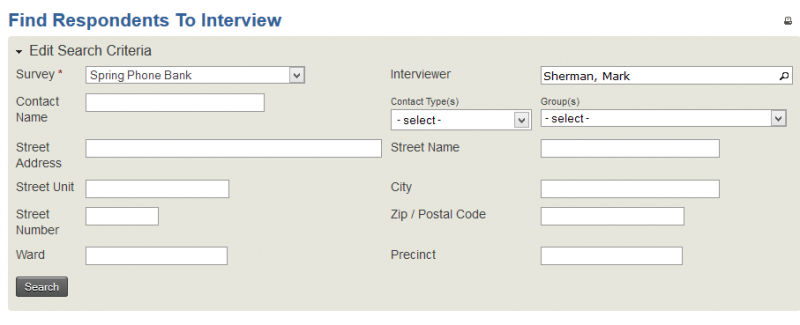
Enter the same Survey and Interviewer as before and select Search.
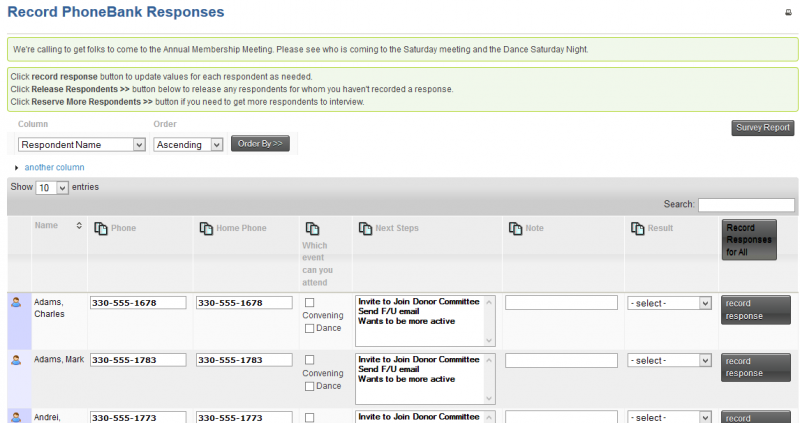
The result is the list of people to be interviewed. The Interviewer makes the calls, selects appropriate responses including the Result and then clicks record response. Doing so releases the contact from the reserved set. If the interviewer didn’t get a connection, the row can be left and it will remain in the Phone Bank. There is also an option at the bottom of the list to release all the respondents.