Powerbase has a peer to peer fundraising feature called Personal Campaign Pages or PCPs for short.
In Powerbase you can configure any event or contribution page to use PCPs - which means individual members of your organizations can create their own custom page inviting people to the event or to make a contribution.
All contributions made through a PCP are linked to the person who created the page via a "soft credit" to the contribution.
See below for the technical details or see our overview on peer-to-peer fundraising.
Setup the contribution or event page
- First, create a new contribution (pictured below) page or event page and enter the details you want regarding your contribution page or event page. You can read more about how to create a contribution page here
- Click on the Personal Campaign Pages tab and check the box to Enable Personal Campaign Pages
Configure the Personal Campaign Pages
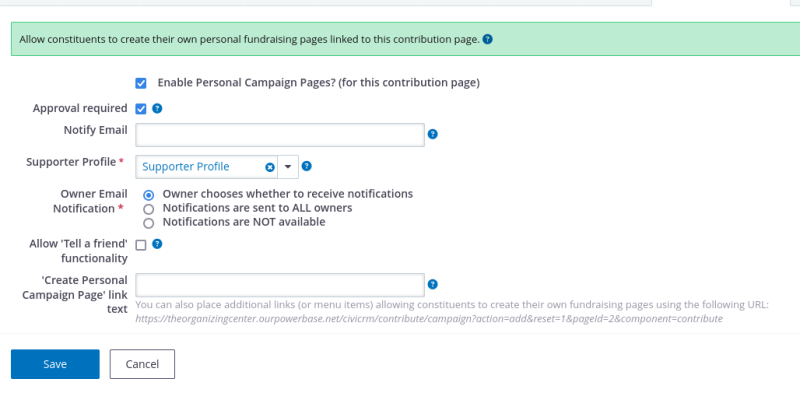
- Approval Required (box is checked as default): so that you can review and approve personal campaign pages to make it live.
- Notify Email: email of person who will be notified if a new PCP page is created or updated.
- Supporter Profile: select the profile to be used to collect info about the person who is creating a personal campaign page. The profile called "Supporter Profile" will likely already be available on your system. If you create a new one, ensure that the "Account creation required" checkbox selected in the "Drupal user account registration option?" row in the Advanced Settings of the Profile Settings is checked (no new users will actually be created - they will instead use the "anonymous").
- Owner email notification: select the option on whether you want notifications of donations to the personal campaign page to be sent to the creator of that page
- Allow "Tell a Friend" functionality?: Please disable this feature. In Powerbase PCP pages are by invite of site administrators only.
- 'Create Personal Campaign Page' link text: Be sure this field is left blank - you will need to delete the text that populates it by default. This steps ensures that only people who you invite will be able to create PCP pages.
Setting up Pages
You can send everyone who you want to create a page the link displayed under the "'Create Personal Campaign Page' link text" field pictured above.
If the person you are sending a link to already has a login to the database (aka they are staff) be sure to ask them to login to the database before they click on the link. They must be logged in first!
For everyone else, be sure that they are entered as a Contact in the database with the same email address they plan to use when filling out the form.
Lastly... you are free to logout of the database and fill in the PCP form on their behalf.
Review and approve
Once a page is created you will need to approve them before they go live. You can see the pages that are awaiting approval by going to Contributions > Personal Campaign Pages. You can then Edit or Approve the personal campaign pages there.
Things to remember
If you try to create a PCP page and you get the error: "There is already an user associated with this email address" it means that you are creating a page for someone who has a login to your database. First, login as the user, then return to the page and you will be able to create it without an error.
Once a user creates a PCP page for themselves, they cannot change the page without the help of someone with a login. That's unfortunate, but necessary to keep your database secure.
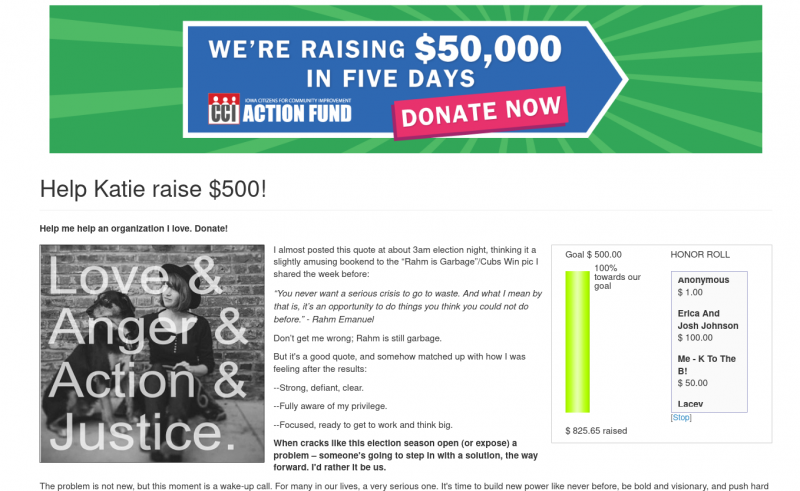
Sample - Here is what it can look like!